Selection Results and Changed Fares
The Selection Results tab is used to view the results returned from the Inclusions and Exclusions group boxes and modify those results if necessary.
To see the results of your submitted criteria set, the job will have to have a status of Successful. Click a row in the table to highlight it and then click the  button or double click the row. The Results screen appears. This screen consists of two tabs. One tab is for Selection Results and the other is Changed Fares. If you submit a criteria set using the Submit Inquiry tool, the program automatically defaults to the Selection Results tab. If you submit a criteria set using the Submit Preview tool, then you are defaulted to the Changed Fares tab.
Selection Results Tab
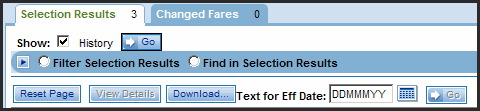
Selection results are the fare sequences on the Master file, which are returned based on the selection criteria coded in the Inclusions and Exclusions group boxes of the query within the criteria set. The table on the Selection Results tab displays the last fare sequences that were applied to the Master file. Prior fare sequences can be viewed by using the History check box (see image below). Check this box and click the  button. If the fare sequence has a prior level that is still available to be viewed, then the fare sequence displays all prior sequences from the earliest to the most current date.
Changed Fares Tab
Changed fares are how the new and/or modified fares sequences display on the Master file based on the coding of the Changes and Matches group boxes of the query within the criteria set. The proposed changed fares can be compared to the fare sequences that are currently on the Master file by using the Original Values check box (see image below). Check this box and then click the button. The table displays two rows for the same changed fare. Row 1 is how the fare sequence currently displays on the Master file at the time the criteria set was submitted. Row 2 is how the fare sequence will display on the Master file based on the coding of the Changes and Matches group boxes in the criteria set.
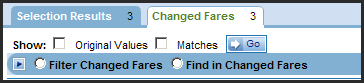
The changed fare can also be compared the fare sequence on the Master file it matched in order to create the result. Click the Matches check box and click the button (see image above). The table displays two rows for the same changed fare. Row 1 is the fare sequence that the changed fare matched. Row 2 is the changed fare.
The Original Values and Matches check boxes can be used together on Changed Fares tab. This allows you to compare the changed fare to the original value it has on the Master file and the fare sequence it matched at the same time. Click the Original Values and Matches boxes and then click the button. The table displays three rows for the changed fare. Row 1 is how the fare sequence currently appears on the Master file. Row 2 is the fare sequence it matched to make the modification. Row 3 is the changed fare.
The Selection Results and Changed Fares tabs both have the ability to sort the columns within the table. This can be done by simply clicking the column to be sorted. The title of the column will highlight to indicate that it has been sorted. To go back to the default view, click the column again.
To use the Find field, type the information you are trying to find and then make a selection from the drop-down list to indicate what you are searching for.
Related Topics
- About Changes
- About Criteria Sets and Query
- About Exclusions
- About Inclusions
- About Matches
- Add, Modify, Restore To/Before, Cancel, Copy as Is, and Copy and Change to New
- Changes Field Descriptions
- Create Criteria Sets and Queries
- Delete a Criteria Set
- Exclusions Field Descriptions
- Inclusions Field Descriptions
- Maintaining Criteria Sets
- Match Options and How They Work with Change Types
- Matches Field Descriptions
- Preview Changed Fares and Submit to Batch
- Submit Preview
- Save and Copy a Criteria Set
- Scopes and Sources
- Selection Results and Changed Fares
- Modifying Fare Records
- Submit to Batch
- Update an Existing Criteria Set
- Submit Inquiry