File Management Summary
The File Management Summary screen is the landing page for the File Management tab. This screen is the central place from which to monitor transmissions and subsequently take an action on selected batches.
This screen consists of three sections. The top section is a filter/search function designed to aid you with locating a particular file on the list. The second section contains a table with the file listing, paging functionality to manage the list and possible actions or navigation buttons that may be performed on a selected file. The third and final section contains actions pertaining to the further processing of individual batches.
Filtering the Results Displayed in the Table
The following fields allow you to filter what you want displayed in the File Management Summary table.
Field Name |
Field Description |
Filter by: Transmitter |
This field is automatically populated with your carrier code. However, the field is blank if you are an ATPCO user. |
Filter by: Date |
|
Filter by: Status |
|
Filter by: Scope |
|
|
Once you have made selections in the fields above, click this button to execute the filter and display results in the table. |
|
Click this button to refresh the data on the current page. |
 button to select a date from the
 next to this field to select a status from the drop-down list.
Available options for this field include:


Available Functionality (Buttons/Links) for Transmitted Files
Function |
Description |
|
Click this button to display a dialog box that allows you to select the file you want to import from your PC to the Fares program. For further information on importing files into the Fares program, see Importing Files. |
|
Click a row in the table and then click this
button to open the File
Source Data screen. From the File Source Data screen you can
click the |
|
Click a row in the table and then click this
button to open the File
History screen. From the File Source Data screen you can click
the |
|
Click a row in the table and then click this button to reload the file. It will reload the file in the condition it was received; therefore, the file will complete with the same status as its previous load.
|
|
Click a row in the table and then click this button to download the file to SuperWylbur.
|


 link to return to the previous screen.



Available Functionality (Buttons/Links) for Batch Processing
Function |
Description |
|
Click a row in the table and then click this button to display the contents of the batch on the View Batch Details screen. |
|
Click a row in the table and then click this button to display the Edit Batch Details screen where you can modify the contents of the batch. |
|
Click a row in the table and then click this button to create a duplicate batch. |
|
Click a row in the table and then click this button to save the contents of a batch to an MS Excel file. (See the Downloads and Downloads Status topic for further information.) |
|
Click a row in the table and then click this button to remove the batch. No further action can be taken on a batch with a status of Deleted; however, batches may be recovered before midnight of the day it was deleted. |
|
Click a row in the table and then click this button to display the View History dialog box. |
|
Click a row in the table and then click this button to send the transactions through the validation process. This action can be applied to multiple batches of the same scope. |
|
Click a row in the table and then click this button to send the transactions through the validation process, and apply the transactions to the database. This action can be applied to multiple batches of the same scope. |
|
Click a row in the table and then click this button to send the transactions through the validation process, apply the transactions to the database, and make the batch available for filing or subscriptions. This action can be applied to multiple batches of the same scope. |





Table Description
Column Name |
Column Description |
Received Date/Time |
The date and time when the file was entered into the system. |
File Status |
Transmission status of the file. |
Batch ID |
The batch identifier of each item in the table. It contains a combination of a prefix code with batch number. |
CXR |
The carrier code for the batch. |
Tariff |
The tariff code for the batch |
Requested Action |
The batch action that was requested each time the batch was modified. Requested actions include Hold, Validate, Apply, or Release. |
Batch Status |
The batch status which can be either Validated, Not Distributed, Available for Filing, Filing in Progress, Filed, Awaiting Distribution, Distribution in Progress, Distributed, or Deleted. |
Total |
The total number of transactions that were processed by the requested action. |
Errors |
The number of transactions that were processed by the requested action, but result in errors. |
Warnings |
The number of warning for a batch. Batch transactions that validated or applied successfully may generate warnings. In these cases, the statuses Validated with Warnings or Applied with Warnings will display. |
Applied |
Number of transactions that have been applied to the database. |
Work Unit |
Applied to International batches only. |
Comments |
The short comments for the batch. This is optional information entered when the batch is created. |
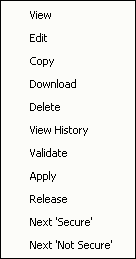
Right Click functionality on File Management Summary
In the File Management Summary table, right-click a row to display a pop-up menu of available functionality for the table. Additional menu options may include the following, depending on the selected batch:
|
Recover Deleted—An already deleted batch can be recovered before midnight the day it was deleted. Next Secure—This action applies only when you are changing the distribution timing of a batch and to certain public US/CA tariffs. The batch will be “secured” until the next subscriptions release. This means that transactions in the batch will not be viewable by other users until after the next subscriptions release. Next Not Secure—This action applies only when you are changing the distribution timing of a batch and to certain public US/CA tariffs. If a batch has been “secured” until a certain subscriptions release, this action will make it non-secured. This means that the batch will be viewable by other users before the next subscriptions release. |