Create a Batch
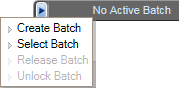
Click the Batch List tab and then click the Create Batch link. The Create/Select Batch dialog box appears. Alternatively, you can click the No Active Batch (or Active Batch if a batch is active) link on the dashboard and then click the Create Batch option on the menu (see image below).
The Batch ID field displays the batch ID of the person who is creating the batch. This is normally a carrier code. However, some users (such as ATPCO employees or other authorized users), have unique batch ID codes.
Type the validating carrier code in the Carrier field.
Click the Private Distribution field label to open the Private Distribution Table dialog box. Select a subscriber and also list any optional subscribers by carrier ID in the provided fields. Click the
 button to continue. The Private Distribution
field is not a required field when creating a batch.
button to continue. The Private Distribution
field is not a required field when creating a batch.Private Distribution allows you to determine to whom the data will be sent in Subscriptions. When a batch has a private distribution, any private segments that you update will always use that distribution except in the case of a date action.
Type an effective date (DDMMMYY) in the Effective Date field. Alternatively, click the Calendar
 button and then double-click a date on the calendar display.
Type relevant comments in the Comments field.
Optionally, you can select the Activate Batch check box to set the batch as the active batch.
Click the
 button.